I spent much of 2015 taking a year long flexible fellowship at Wheaton Arts’ Creative Glass Center of America developing ways to cast glass from computer generated sculptural forms and wanted to take some time to share these learnings. I worked extensively with glass many years ago but now create most of my art with 3D scanning and printing. The Wheaton Arts’ fellowship was a unique opportunity to bring these two practices back together.

My work in the last few years has used a combination of 3D modeling techniques. I usually begin with 3D scanning, primarily structured light scanning with Primesense/Kinect style devices and occasionally photogrammetry for non human subjects. Other non-organic forms are just modeled directly in the computer using my software of choice Zbrush. Next I will digitally manipulate and sculpt the 3D scans in the computer. Finally the work is output as a 3D print. My investigations this year took these techniques further, so that these digital sculpts were then realized as cast glass forms. I tried a few variations of lost PLA casting, as well as CNC milling graphite to make reusable molds. Enjoy.
Lost PLA Kiln Casting
The first technique I chose to explore is what people are calling “Lost PLA”, basically an evolution of the traditional lost wax kiln casting technique. Starting with a 3D printed positive of the form I want to cast in glass, I created a plaster/silica mold around my 3D print.
The actual recipe for the mold by weight was:
- 16 parts water
- 6 parts Hydroperm
- 6 parts Plaster
- 6 parts Silica (or olivine sand)
- 1 cup 3/4″ fiberglass strand
This could be done with just a 50/50% plaster-silica mix, but as I understand it the Hydroperm foams and creates air pockets in the molds to make them lighter. The fiberglass strand helps strengthen the mold and helps wick out the moisture so the molds dry more efficiently.
I began by plugging any holes in the surface of the 3D prints with microcrystalline wax and waxing the prints down to a table. I then just cut strips of tar paper and hot glued them down to form a wall around the print, leaving room for about 3″ of mold thickness. I mixed a small initial coat of mix with no fiberglass strand to use as a splash coat over the object, then mixed subsequent buckets of mix to fill the molds completely. After the mold was filled, I let it set before tipping the molds on their sides to dry (having fans helped this).


After a minimum of one day drying (and preferably more like a week), the molds were ready to be loaded into the ovens. The PLA was still on the inside and needed to be melted out. With lost wax casting, the general practice is to steam the wax out of a mold. I tried this with the 3D printed PLA and barely got it to move at all. Steaming out PLA is not an option so it has to be burned out in an oven.
Even though PLA is a biodegradable corn starch, the burnout is smoky and not good to be around so it had to be timed to happen overnight when the studio was empty. I would begin by soaking the oven at 300˚ for about three hours and then pushing it upwards at about 100˚/hour. At about 450˚ I would go in (wearing gloves, glasses and a respirator) and use pliers to pull out some big chunks of plastic as it started melting. I had to be careful not to damage the mold in doing so. At about 700˚, I would go in with a stainless steel turkey baster and suck out as much molten plastic as possible. The oven would then go to 1000˚ for an hour and be fully burned out. Because burn out in an oven is pretty nasty smelling at its peak and I can’t really recommend it as a best practice. However, I just became aware of Moldlay– a 3D printing filament designed for lost wax casting. It’s expensive but I would like to check it out.


From there I tried two basic approaches to casting into the plaster molds. The first technique involved putting molten glass from a furnace directly into the molds. The second involved cooling the molds back down, packing them with chunks of crystal glass, then firing them to melting point. Each techniques has its strengths and weaknesses.
Lost PLA Kiln Casting Technique 1- “Hot Glass Lacrosse Casting”
Since buying crystal to kiln cast with is very expensive, I was trying to be more cost effective by using the readily available furnace glass to cast with. Basically, after the mold was burned out I would soak it at 1000˚ for several hours to burn out any chemical water, and then we would ladle glass directly into the molds. I found that even after I soaked the molds 10-12 hours at 1000˚, the chemical water in the plaster would still cause the glass to bubble up as we poured the glass in. We then resorted to a technique we called Lacrosse Casting. I would gather a ladle of glass, then dump the ladle into a second ladle someone else was holding. They would rock the ladle side to side so that the molten glass skinned up on the outside a little. They would then dump that back into my ladle and I would go to the oven and gingerly drop this “hot tamale” of glass into the mold. The center of the glass was still quite hot but the skinned up exterior was less likely to bubble. Unfortunately the molds are quite fragile and this can cause damage if there are a lot of delicate details to the mold. After the mold was filled, the oven would be sent up to about 1500-1600˚ to make the flatten out and flow into the mold. As soon as the glass flattened, the oven was crashed back down to under 1000˚ and an annealing cycle began.


Issues with this technique
- This process takes a lot of time! I was casting forms that took 2+ days to print, then there was mold making, casting and annealing.
- The plaster molds are extremely fragile and can easily be damaged by the glass as it is dropped in the mold. This results with imperfect castings that often have bits of plaster encased in the glass.
- If the ladles are not very clean, the glass will often have veiling from the ladle surface. Bubbles are also often introduced resulting in a very bubbly glass. In my case I liked the underwater look this gave.
- Devitrification is a crystalizing of glass that happens at approximately 1200 degrees, making the surface of the glass fog up. Soda lime glass (Spruce Pine batch) is particularly vulnerable to this. In my case, if there was not enough radiant heat above the top of the mold and it took too long for the oven to heat up for the glass to level out in the mold, the surface would fog up.
Sample Castings (Unfinished work)


Lost PLA Kiln Casting Technique 2- Kiln Casting
The issues with molds being damaged by hot glass and devitrification lead me to acquire some crystal to kiln cast with. Casting crystal is expensive and usually formulated to not devitrify so in general this technique delivers more optically pure castings. I tried two glass formulas for kiln casting; Uroboros Glass’ system 96 and Schott optical crystal.
After the mold is burned out, I would let the oven slowly return to room temperature so I could carefully vacuum it out and pack it with chunks of glass (My glass came in large tiles so I cleaned the surface with alcohol and then used a torch to shatter them.
The small chunks could then be loaded in the mold, and the oven slowly brought back up to about 1550˚ until they melted in completely and the worst of the bubbles came to the surface. At that point the oven was crashed back down to under 1000˚ and the glass is annealed (slowly brought to room temperature).

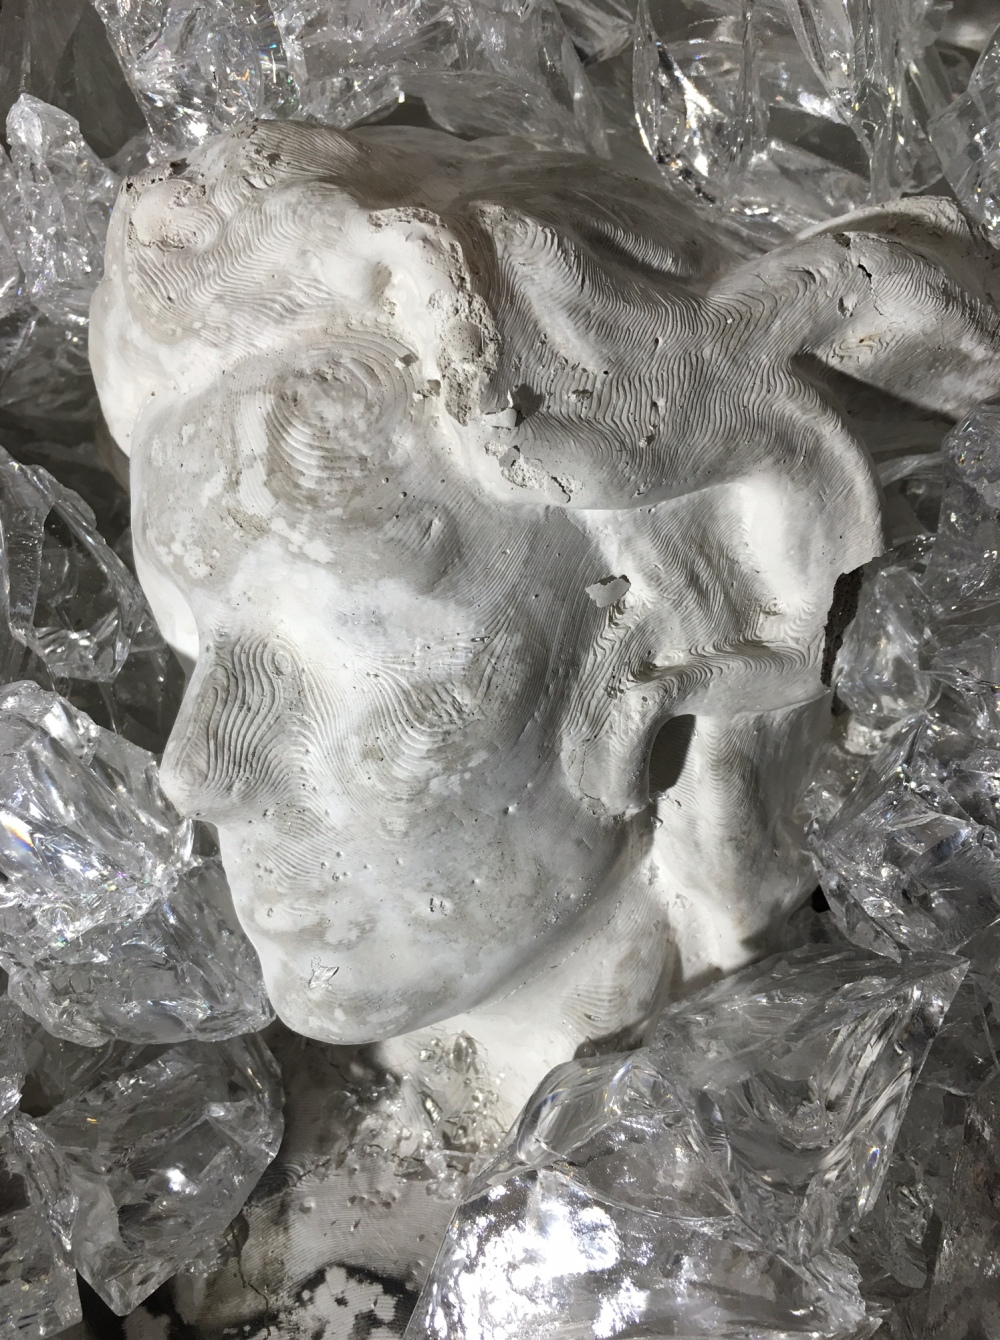


- This technique definitely yielded the best casting results for Lost PLA
- More expensive- both in the time consuming process, oven time and most significantly the cost of the casting crystal
- Devitrification can still be an issue, depending upon the glass used
- The final casting still requires extensive grinding, polishing and finishing work


Hot Glass Casting into CNC milled graphite molds
I quickly realized that the lost PLA technique was time consuming and disconnected from all the excitement and spontaneity that I associate with hot glass work. Lost PLA castings also required extensive work divesting from the mold, then grinding and polishing. I had long wanted to experiment with CNC carving as opposed to 3D printing, and set out to experiment with milling graphite to create reusable molds as a more cost effective approach for casting glass with.

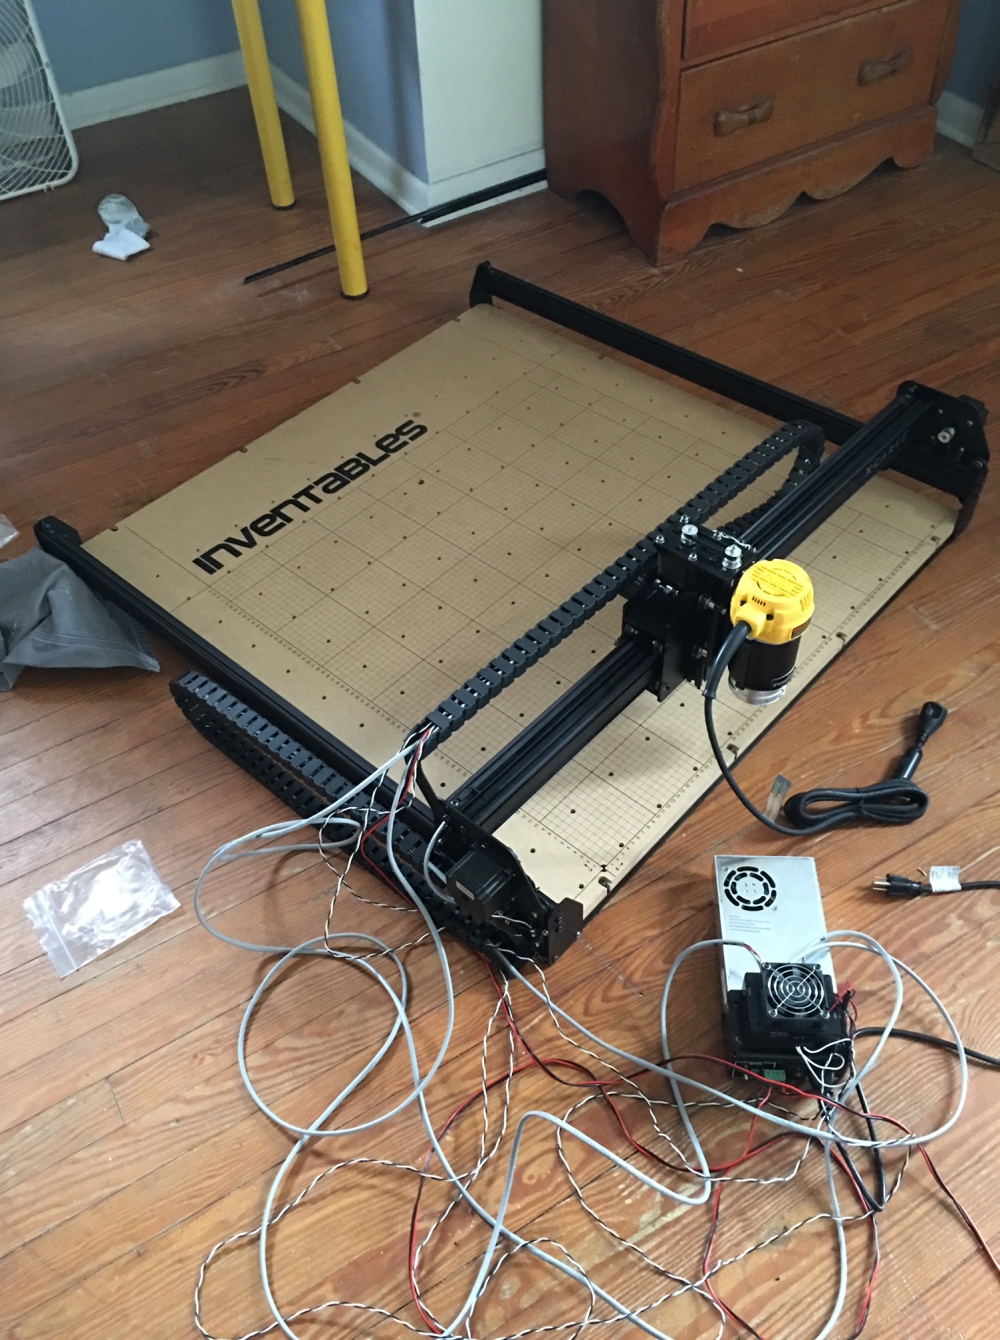
I decided to purchase the Inventables XCarve because it is an open source CNC machine, and I wanted to support Inventables great work in making CNC software more user friendly. I opted for the 1000mm version with the heavy duty Nema 23 motors and Dewalt 611 spindle which has enough power to even mill aluminum. I had a lot of trepidation about building a kit as some of the 3D printer kits I had built in the past were not well documented, but Inventables documentation was excellent and it worked pretty well right off the bat. A few support calls and posts on the message boards got me through the few small hiccoughs that I did encounter.
However, I was concerned about milling graphite as the dust is electrically conductive. If that dust got all over as I was using the machine, not only would it make a mess, it could also fry the Xcarve Arduino controller, and even the laptop driving the setup. I had no choice but to rig up a robust dust collection system. I ended up buying a dust shoe from KentCNC to mount around the spindle (Yes, I could have made my own but was running out of time at Wheaton by then). This then attached to a Dust Deputy cyclonic dust collector and a shop vacuum. The result was a powerful dust collection system that captures nearly all the graphite coming off the spindle as it cuts, and 95% of it ends up in my new favorite tool, the Dust Deputy.


Coming out of the last year of experiments, I’m most excited about this process as it has a lot of potential for small run computer designed glass objects and custom tiles for architectural use. There are some design restrictions in that molds cannot have undercuts and the Xcarve can only cut about 2 1/2″ at the deepest, but because these molds can be quickly and comparatively cheaply generated and used to create cost effective editions, I think this approach has a lot of promise. I look forward to continuing to experiment with these techniques as I share them with my class this June at the Pilchuck Glass School.


I love the detail on that face mold how long did the 1/8 bit take with the finishe passes?
You can design and mill taller supports for your Y rails in order to get more travel out of your Z axis, also there are several mods you can find in the forum to stiffen you gantry and improve overall perfomance.
While the Easel software is great to get persons started i would advise you to move on to fusion 360 (free depending on how much business you do) or another cad/cam package to really get the full potential out of you new x-carve.